Assigning a public IP to your Raspberry Pi might sound like a tech wizard's trick, but it’s simpler than you think. Whether you're building a home server, running a personal website, or experimenting with IoT projects, having a public IP can open up a world of possibilities. In this guide, we’ll walk you through everything you need to know to make your Raspberry Pi accessible from anywhere on the internet.
Picture this: you’ve got your Raspberry Pi set up, running like a champ, but you want to take it to the next level. You’re thinking, “What if I could access my Pi remotely, no matter where I am?” That’s where assigning a public IP comes in. It’s like giving your Pi a permanent address on the internet, so you can connect to it anytime, anywhere.
Now, don’t let the tech jargon scare you. This guide is designed for beginners and intermediate users alike. We’ll cover everything from understanding what a public IP is to setting up your Raspberry Pi for remote access. By the end of this, you’ll be rocking your Pi like a pro!
Read also:Is Boneyard A True Story Unraveling The Mystery Behind The Blockbuster Thriller
What is a Public IP Address and Why Do You Need It?
A public IP address is like your home’s street address on the internet. It’s the unique identifier that allows devices outside your local network to find and communicate with your Raspberry Pi. Without a public IP, your Pi is stuck inside your local network, unreachable from the outside world.
Why would you want a public IP for your Raspberry Pi? Well, there are tons of reasons! You might want to:
- Host a personal website or blog
- Set up a media server for streaming movies and music
- Run a Minecraft server for your friends
- Create an IoT dashboard to monitor your home
- Access your files remotely
Assigning a public IP to your Raspberry Pi gives you the freedom to do all these things and more. It’s like unlocking a superpower for your little Pi.
Understanding the Difference Between Public and Private IPs
Before we dive into the nitty-gritty, let’s clear up the confusion between public and private IP addresses. Your Raspberry Pi probably already has a private IP address, which is used within your local network. This address is usually something like 192.168.1.100 and is assigned by your router.
A private IP is great for communicating with devices on your local network, but it’s not visible to the outside world. A public IP, on the other hand, is assigned by your Internet Service Provider (ISP) and is visible to everyone on the internet. Think of it as the difference between your apartment number and your city’s zip code.
How Do Public IPs Work?
When you connect to the internet, your ISP assigns a public IP to your router. This IP acts as the main gateway for all devices on your network. To make your Raspberry Pi accessible from the internet, you’ll need to configure your router to forward traffic to your Pi’s private IP.
Read also:Luxury Hotels In Jasper Your Ultimate Guide To Unforgettable Stays
It’s like setting up a mailroom in your apartment building. The public IP is the building’s address, and the private IP is your apartment number. When someone sends a package to your building, the mailroom (your router) knows to deliver it to your apartment (your Pi).
Step-by-Step Guide to Assign Public IP to Raspberry Pi
Now that you understand the basics, let’s get down to business. Here’s a step-by-step guide to assigning a public IP to your Raspberry Pi:
Step 1: Check Your Current Public IP
The first thing you need to do is find out your current public IP address. You can do this by simply Googling “what is my IP address.” Your public IP will pop up in the search results.
Pro Tip: If your ISP assigns dynamic IPs (which most do), your public IP might change periodically. Don’t worry, we’ll cover how to handle that later.
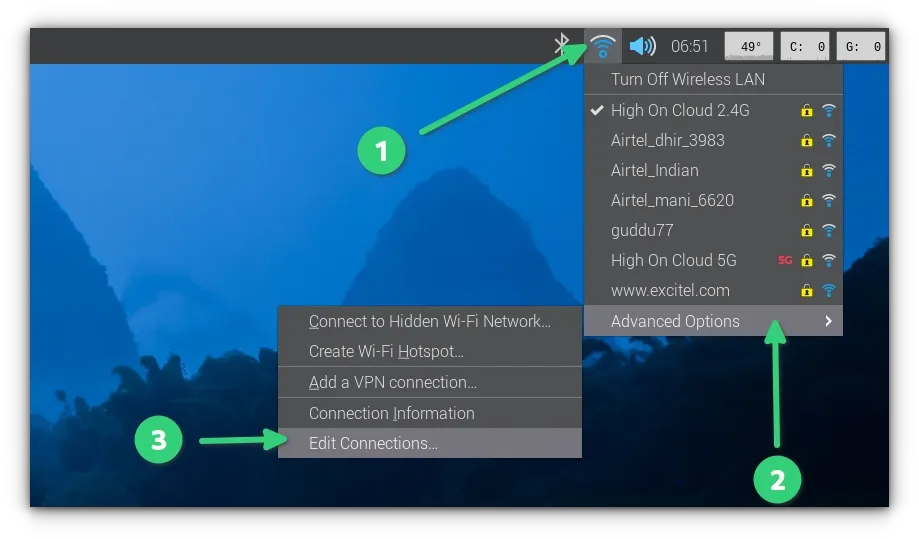
Step 2: Log in to Your Router
Next, you’ll need to log in to your router’s admin interface. To do this, open a web browser and enter your router’s private IP address (usually something like 192.168.1.1) in the address bar. You’ll be prompted to enter your router’s username and password.
If you don’t know your router’s credentials, check the manual or look on the back of the router for default login details. If you’ve changed them and forgotten, you might need to reset your router.
Step 3: Find Your Raspberry Pi’s Private IP
Once you’re logged into your router, look for a section called “Attached Devices” or something similar. Here, you’ll see a list of all devices connected to your network, along with their private IP addresses. Find your Raspberry Pi in the list and note its private IP.
Fun Fact: Most routers allow you to assign a static private IP to your devices. This ensures that your Pi always gets the same private IP, even if you restart your router.
Step 4: Set Up Port Forwarding
Now comes the magic part: port forwarding. This is where you tell your router to forward incoming traffic on specific ports to your Raspberry Pi’s private IP. For example, if you’re hosting a website, you’ll want to forward port 80 (HTTP) and port 443 (HTTPS).
Here’s how to do it:
- Go to the “Port Forwarding” or “Virtual Servers” section in your router’s admin interface.
- Add a new rule and specify the port numbers you want to forward.
- Enter your Raspberry Pi’s private IP as the destination address.
- Save the changes and restart your router if necessary.
Heads Up: Different routers have different interfaces, so the exact steps might vary. Check your router’s manual or manufacturer’s website for specific instructions.
Step 5: Test Your Setup
Once you’ve set up port forwarding, it’s time to test your setup. Open a web browser on a device outside your local network (like your phone using mobile data) and enter your public IP followed by the port number in the address bar. For example, if you’re forwarding port 80, you’d enter something like http://your-public-ip:80.
If everything is set up correctly, you should see your Raspberry Pi’s web server or whatever service you’re running. Congrats, you’ve successfully assigned a public IP to your Pi!
Handling Dynamic IPs with Dynamic DNS
As we mentioned earlier, most ISPs assign dynamic public IPs, which can change periodically. This can be a problem if you want to access your Raspberry Pi from a fixed address. Thankfully, there’s a solution: Dynamic DNS (DDNS).
DDNS services like No-IP or DuckDNS allow you to assign a hostname to your Raspberry Pi that automatically updates when your public IP changes. Here’s how to set it up:
- Create an account with a DDNS provider.
- Download and install their client software on your Raspberry Pi.
- Configure the software to update your hostname with your current public IP.
With DDNS, you can access your Pi using a memorable hostname instead of a constantly changing IP address. It’s like having a personal domain name for your Pi!
Why Use DDNS?
DDNS offers several advantages:
- Convenience: You don’t have to keep track of your changing public IP.
- Security: Some DDNS providers offer SSL certificates, allowing you to access your Pi securely over HTTPS.
- Flexibility: You can use custom hostnames that are easier to remember than IP addresses.
It’s a win-win situation. Why wouldn’t you use DDNS?
Securing Your Raspberry Pi for Public Access
Assigning a public IP to your Raspberry Pi is exciting, but it also comes with responsibilities. Exposing your Pi to the internet means it’s vulnerable to attacks from hackers and bots. Here are some tips to keep your Pi secure:
- Use Strong Passwords: Change the default username and password for your Pi and use strong, unique passwords.
- Enable SSH Keys: Disable password-based SSH login and use SSH keys for authentication instead.
- Install a Firewall: Use tools like UFW (Uncomplicated Firewall) to control incoming and outgoing traffic.
- Keep Software Updated: Regularly update your Pi’s software to patch security vulnerabilities.
- Use Non-Standard Ports: Change default ports for services like SSH to make it harder for attackers to find them.
Remember, security is an ongoing process. Stay vigilant and keep your Pi safe!
Common Issues and Troubleshooting
Even with the best-laid plans, things can go wrong. Here are some common issues you might encounter when assigning a public IP to your Raspberry Pi and how to fix them:
- Port Forwarding Not Working: Double-check your router’s settings and ensure that the correct ports are being forwarded to your Pi’s private IP.
- Dynamic IP Changes: If your public IP changes unexpectedly, update your DDNS service to reflect the new address.
- Firewall Blocks Traffic: Make sure your Pi’s firewall rules allow incoming traffic on the ports you’re forwarding.
- Router Restrictions: Some ISPs block certain ports or don’t allow public IPs for residential customers. Contact your ISP if you suspect this is the case.
Don’t get discouraged if you run into problems. Troubleshooting is half the fun of tinkering with tech!
Conclusion and Next Steps
Assigning a public IP to your Raspberry Pi might seem daunting at first, but with this guide, you’ve got everything you need to get started. By following the steps outlined above, you can make your Pi accessible from anywhere on the internet and unlock its full potential.
Remember, security is key. Always take the necessary precautions to protect your Pi from unwanted intrusions. And don’t forget to explore all the amazing things you can do with a publicly accessible Raspberry Pi!
Now that you’ve learned how to assign a public IP to your Raspberry Pi, what’s next? Why not try hosting a website, setting up a media server, or creating an IoT dashboard? The possibilities are endless!
Feel free to leave a comment below with any questions or share this article with your tech-savvy friends. Happy Pi-ing!
Table of Contents
- What is a Public IP Address and Why Do You Need It?
- Understanding the Difference Between Public and Private IPs
- Step-by-Step Guide to Assign Public IP to Raspberry Pi
- Handling Dynamic IPs with Dynamic DNS
- Securing Your Raspberry Pi for Public Access
- Common Issues and Troubleshooting
- Conclusion and Next Steps