Hey there, tech enthusiasts! If you've ever wondered how to get your Raspberry Pi's public IP address, you're in the right place. Whether you're setting up a home server, configuring remote access, or just curious about networking, this guide will walk you through everything you need to know. Let's dive in and make your Raspberry Pi project a success!
Let's face it—Raspberry Pi is one of the coolest gadgets out there. It’s a tiny but powerful computer that can do everything from running media centers to hosting websites. But here's the deal: to make the most out of your Pi, you often need to know its public IP address. Whether you're accessing it remotely or configuring port forwarding, understanding how to get this information is crucial.
In this article, we’ll break down the steps to get your Raspberry Pi's public IP address. We'll cover simple methods, tools you can use, and even some advanced techniques for those who want to geek out. So grab a cup of coffee, sit back, and let's unravel the mystery of Raspberry Pi networking!
Read also:Shania Twain Current Projects A Behindthescenes Look At Whats Next For The Queen Of Country Pop
Why Knowing Your Raspberry Pi's Public IP Address Matters
Before we jump into the nitty-gritty, let’s talk about why knowing your Raspberry Pi's public IP address is so important. Imagine this: you’ve set up a web server on your Pi, and you want to share it with friends or access it from work. Without the public IP address, it's like trying to call someone without knowing their phone number. Your public IP is the gateway to the world, and it’s essential for remote access, port forwarding, and more.
Public IP vs Private IP: What's the Difference?
Alright, let’s clear up some confusion. Your Raspberry Pi has two types of IP addresses:
- Private IP Address: This is the address your Pi uses within your local network. It’s usually something like 192.168.x.x or 10.x.x.x. Think of it as your home address—it only works within your neighborhood (local network).
- Public IP Address: This is the address your router uses to connect to the internet. It’s like your postal address—it’s visible to the outside world and allows others to reach you.
While your private IP is useful for local networking, your public IP is what you need when you want to access your Pi from the internet.
Method 1: Using a Simple Command-Line Tool
One of the easiest ways to get your Raspberry Pi's public IP address is by using a command-line tool. If you’re comfortable with the terminal, this method is quick and straightforward.
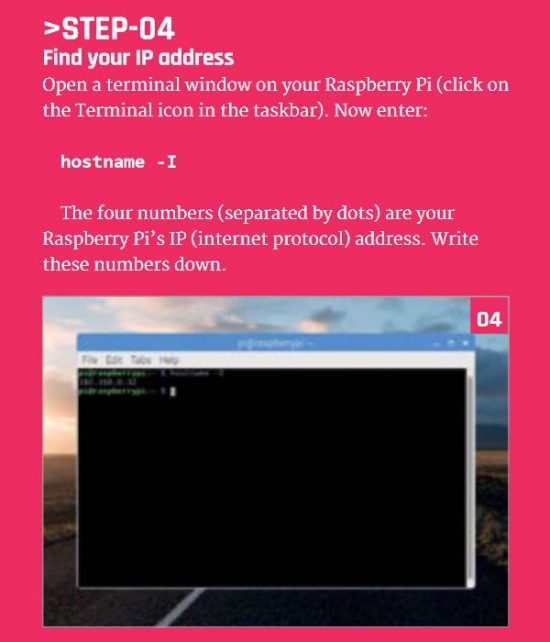
Step 1: Open the Terminal
First things first, open the terminal on your Raspberry Pi. If you’re using the GUI, you can find it in the menu under Accessories. If you’re working headless (no monitor), you can SSH into your Pi.
Step 2: Run the Command
Now, type the following command and hit Enter:
Read also:Most Expensive Houses On Zillow Your Ultimate Guide To Luxury Real Estate
curl ifconfig.me
This command sends a request to a public server, which responds with your public IP address. Simple, right?
Method 2: Using Python Script
If you’re a Python lover, you can create a simple script to fetch your public IP address. This method is great if you want to automate the process or integrate it into a larger project.
Step 1: Install Requests Library
First, you’ll need to install the Requests library if you haven’t already. Run the following command:
sudo apt-get install python3-pip
pip3 install requests
Step 2: Write the Script
Now, create a Python script with the following code:
import requests response = requests.get('https://api.ipify.org') public_ip = response.text print("Your Public IP Address is:", public_ip)
Save the script as get_ip.py and run it using:
python3 get_ip.py
Method 3: Using a Web Browser
Believe it or not, you don’t even need the terminal to get your Raspberry Pi's public IP address. You can simply open a web browser and visit a website that displays your public IP.
Step 1: Open a Web Browser
Launch your favorite browser on your Raspberry Pi. If you’re using the default desktop environment, you’ll likely have Chromium installed.
Step 2: Visit a Public IP Service
Go to one of these websites:
These websites will display your public IP address instantly. Easy peasy!
Troubleshooting Common Issues
Even with these methods, you might run into some issues. Let’s tackle a few common problems:
Problem 1: Public IP Not Showing Up
If none of the methods above work, check your router settings. Some routers have a feature called "NAT Loopback" that might prevent your Pi from seeing its public IP. You can also try restarting your router or contacting your ISP.
Problem 2: IP Address Keeps Changing
If your public IP changes frequently, consider setting up a dynamic DNS (DDNS) service. This will give you a consistent domain name that points to your IP, even if it changes. Popular DDNS services include No-IP and DuckDNS.
Advanced Techniques for Power Users
For those who want to take things to the next level, here are a couple of advanced techniques:
Setting Up a Static Public IP
If you want a permanent public IP address, you’ll need to contact your ISP. They can assign you a static IP for a fee. Keep in mind that this is usually only available on business plans.
Using Port Forwarding
Once you know your public IP, you can configure port forwarding on your router to allow external access to your Raspberry Pi. This is useful for hosting web servers, SSH, or other services.
Best Practices for Security
With great power comes great responsibility. Here are a few tips to keep your Raspberry Pi secure:
- Change the default SSH password and username.
- Enable a firewall to block unauthorized access.
- Keep your software up to date with
sudo apt-get updateandsudo apt-get upgrade. - Consider using a VPN to add an extra layer of security.
Conclusion
And there you have it—everything you need to know about getting your Raspberry Pi's public IP address. Whether you’re using the terminal, Python, or a web browser, the process is straightforward and accessible to everyone. Just remember to follow best practices to keep your Pi secure.
Now it’s your turn! Try out these methods and let us know which one works best for you. If you have any questions or need further assistance, drop a comment below. And if you found this article helpful, don’t forget to share it with your fellow tech enthusiasts. Happy Pi-ing!
Table of Contents
- Why Knowing Your Raspberry Pi's Public IP Address Matters
- Public IP vs Private IP: What's the Difference?
- Method 1: Using a Simple Command-Line Tool
- Method 2: Using Python Script
- Method 3: Using a Web Browser
- Troubleshooting Common Issues
- Advanced Techniques for Power Users
- Best Practices for Security
- Conclusion